If you are confused about how to set Nest thermostat to hold temperature, worry no more! This is a very simple task that you can do on your own! Let’s dive into the details and find out right now!
Quick Answer
The Nest Thermostat is supposed to be a smart thermostat, so it can be frustrating when it doesn’t do what you want it to do. Especially when it Is such a basic feature as setting the temperature to a constant holding temp. I mean, this is what thermostats have been able to do for a long time before smart thermostats were even thought of.
Here is how you can set your Nest Thermostat to hold at a given temperature.
Holding the Temperature on the Nest Thermostat can be bone in the Google Home app. The hold temperature feature is not available for the Nest Learning Thermostat but can be achieved by disabling Auto-Schedule, disabling Eco for both heating and cooling, and then resetting your schedule.
I understand that the naming can be somewhat confusing. So, let’s get that cleared up.
There are three Nest Thermostat models:
- Nest Learning Thermostat;
- Nest Thermostat;
- Nest Thermostat E.

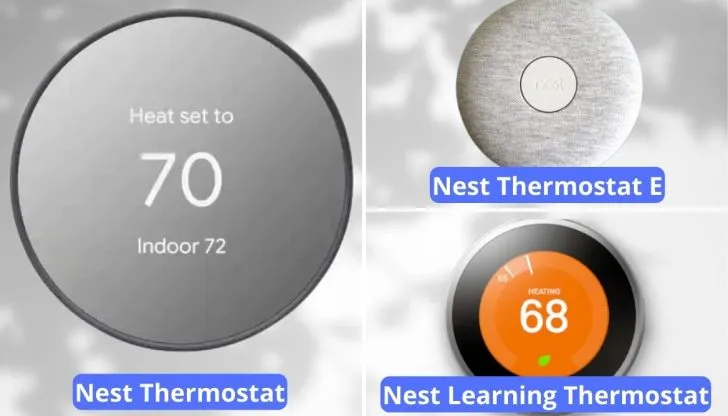
Nest Learning Thermostat is the expensive one, that learns what you like. Unfortunately, this is the part that makes it hard to set a holding temperature. Nest Thermostat E is made with a cheaper plastic body but learns your temperature patterns too.
Related Content: Do Nest Thermostats Have Cameras or Microphones in Them?
The Nest Thermostat (Not the Learning or E version), was developed as a competitor to the Ecobee. Thus, it operates in the Google Home app, and it is relatively easy to set and clear hold temperatures. Google has this topic pretty well covered, as can be seen on their support website here, so I’m going to cover how you can set your Nest Learning Thermostat to hold a temperature.
How to Set Nest Learning Thermostat to Hold Temperature?
The Nest Learning Thermostat was designed to learn your daily routine and automatically create a temperature schedule based on that routine. This is what Nest calls Auto-Schedule.
There are a lot of use cases I’ve seen where Nest users did not want Nest to create a schedule and automatically change the temperature. For instance, people with vacation rentals who are not at the property that often. If Nest changes the temperature, that becomes a lot of wasted energy and a surprise electric bill for the owner.
If you want your Nest Learning Thermostat to behave more like a traditional thermostat, there are a few hoops you’re going to have to jump through. Don’t worry, they’re not that hard, but it is a little inconvenient that they don’t have this option built-in.
I’ll give you step-by-step instructions, but the whole idea is to turn off auto-schedule, delete what it had previously created, and then (optionally) create a new schedule that will hold the temperature for you. There are also a few more settings that need to be turned off so that they don’t automatically turn on and start your system.
Read Also: Ecobee Smart Thermostat vs Ecobee 4
Steps to Set Nest Learning Thermostat to Hold Temperature
Let’s go step by step through how to set up the Nest Learning Thermostat to hold the temperature.
1. Disable Auto-Schedule
The Nest Learning thermostat is designed to learn your desired temperature preferences, and automatically create a schedule based on those preferences and your schedule. However, having this learning feature turned on, will make it so Nest will not hold your temperature.
Auto-scheduling must be turned off. It is turned on by default when you first install the thermostat. There are two ways you can turn off auto-scheduling; either on the thermostat itself or through the Nest app.


Option 1: Disable Auto-Schedule from Nest Thermostat:
- Click the Thermostat to bring up the main menu;
- Select Settings (There Gear looking icon with an exclamation point in the middle);
- Scroll to and Select Nest Sense;
- Scroll to and Select Auto-Schedule;
- Select “Off”.


Nest will indicate for about three seconds that it is “Turning Off Auto-Schedule.” That is all for this step, you can move on to step 2 now.
Option 2: Disable Auto-Schedule from the Nest App:
- Select your Thermostat in the Nest app;
- Select Settings (There Gear looking icon in the top right corner);
- Scroll to and Select Auto-Schedule (Under the Nest Sense category);
- Select “Off”.


Like doing it directly on the thermostat, Nest will indicate that it is “Turning Off Auto-Schedule.” That is all for this step, you can move on to step 2 now. Here is a video that shows you have to disable Auto-Schedule, as well as how to clear the schedule (step 3).
He does it in the opposite order than I have listed here, where he resets the schedule and then disables Auto-Schedule. I don’t recommend this order because it gives Auto-Schedule a chance to create a new schedule without you realizing it.
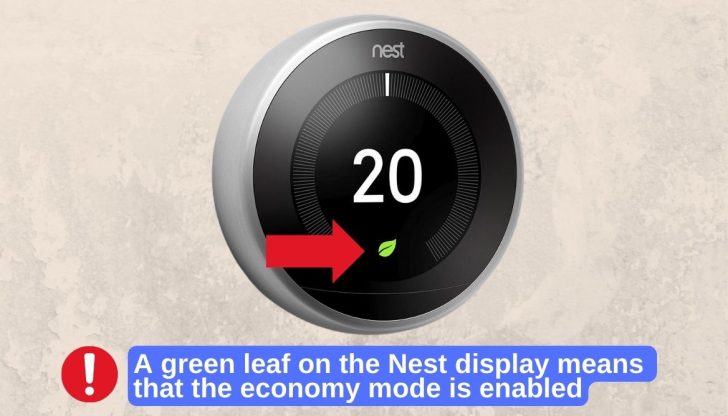
2. Disable Eco Temperatures
Nest has a feature called Eco Temperatures that will adjust the temperature automatically when it determines that no one is home. Eco Temperatures is designed to help conserve energy and save you money by adjusting the temperature so that the HVAC units do not have to turn on as often.
If you have ever seen a green leaf on the Nest display, or when you open the app, that means Eco mode was enabled. This should never happen again if you have properly disabled Eco Temperatures.

It makes sense not to need the perfect temperature when you’re not at home, but there are certain instances where you want to hold the temperature, whether Nest thinks that you are home or not. Hence you are already on step two of the process.
The problem with Eco Temperatures is that if the feature is enabled, your thermostat might still automatically switch to its Eco Temperature when it senses that everybody has left home. Thus, getting rid of the hold temperature you had previously set. Here are two ways you can turn off Eco Temperatures:
- On the thermostat itself;
- Through the Nest app.
Are you feeling a trend here? You can do most of these steps either on the thermostat or through the Nest app.
Option 1: Disable Eco Temperatures from Nest Thermostat:
- Click the Thermostat to bring up the main menu;
- Select Settings (There Gear looking icon with an exclamation point in the middle);
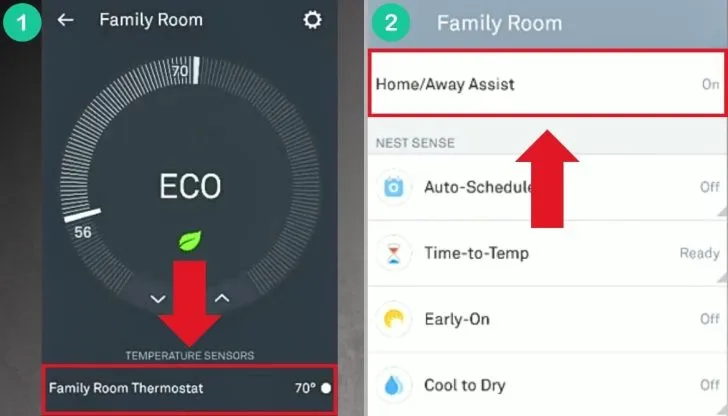
- Scroll to and Select Home/Away Assist;
- Scroll to and Select Stop Using.
I think it’s also a good idea to set the Eco temperature setting to “off” as a backup. Here are the steps.
Steps to set the Nest’s Eco temperature setting to “off”:
- Click the Thermostat to bring up the main menu;
- Select Settings (There Gear looking icon with an exclamation point in the middle);
- Scroll to and Select Eco;
- Set “Heat to” to “Off” by scrolling all the way to the lowest setting;
- Set “Cool to” to “Off” by scrolling all the way to the highest setting;
- Scroll to and select Done to save the changes that you have made.
Eco Temperatures isn’t technically disabled, but it should never turn on based on these settings. However, I recommend setting it to off using the Nest app as well.
Option 2: Disable Eco Temperatures from the Nest App:
- Select your Thermostat in the Nest app;
- Select Settings (There Gear looking icon in the top right corner);
- Scroll to and Select Home/Away Assist (Should be the first option);
- Select “Off”.


Eco Temperatures should be disabled. I recommend also changing the temperature ranges as well, as was shown in the steps above for doing so on the physical Nest Thermostat.
In the event that Google updates the app and/or the Nest Thermostat menus, the instructions should also be updated on the Google support page here, located under the section titled “How to change which temperature Eco heats or cools to”
3. Reset the Schedule
There are two ways you can clear your Nest’s schedule; either on the thermostat itself or through the Nest app.
Reset your Schedule from Nest Thermostat:
- Click the Thermostat to bring up the main menu;
- Select Settings (There Gear looking icon with an exclamation point in the middle);
- Scroll to and Select Reset;
- Scroll to and Select Schedule (This might say Auto-Schedule depending on your other settings);
- Select Reset (This might say Clear depending on your version);
- Turn the ring to confirm that you want to reset your schedule.
Nest will count down for 10 seconds indicating that it is about to reset the schedule. You have the option of canceling during these ten seconds. This is one of the few steps that must be done on the Nest Thermostat, and not through the Nest app.
I was not able to find a way to reset the schedule using the app, but this could be updated at any time. Here is a video that shows you what it should look like resetting the schedule.
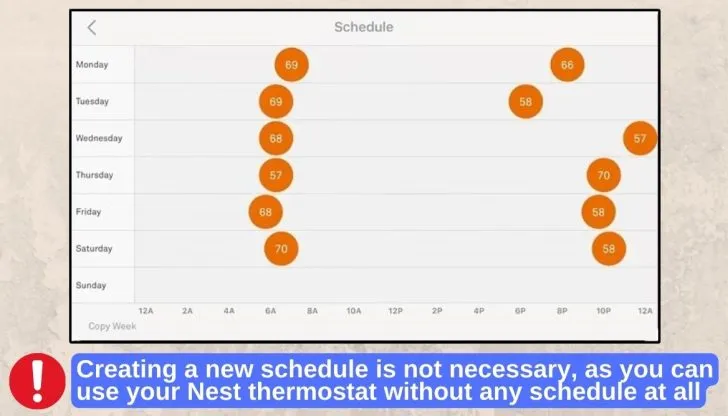
4. Create a new Manual Schedule (optional)
This step is optional because you could use the Nest Thermostat without any schedule at all. According to Google:
“If you don’t set up a schedule after clearing it, your thermostat will stay on whatever temperature you set it to until you select a new temperature. This means it will work like a traditional non-programmable thermostat or like “hold” mode on a programmable thermostat.”
If you want a little more control instead of a constant temperature, you can create a manual schedule. This means your Nest will behave like a regular programmable thermostat, with Wi-Fi control.

Here is how you can set up your manual schedule.
Option 1: Setting a Manual Schedule from Nest Thermostat:
- Click the Thermostat to bring up the main menu;
- Select Schedule (There Calendar looking icon);
- Set temperatures for each day and timeframe as desired.
I recommend using the app, as it can be a little easier to adjust and set the preferred temperature settings. I also recommend referring to Google’s instructions if you need help on how to set the actual temperatures. Their support page on the topic can be found here.
Option 2: Setting a Manual Schedule from the Nest App:
- Click the Thermostat to bring up the main menu
- Select Schedule (There Calendar looking icon)
- Set temperatures for each day and timeframe as desired
Here is a video of how to set up a schedule manually on the Nest Thermostat.
Here is a video of how to setup a schedule manually in the Nest app.
Why Does Nest Thermostat Keep Changing Temp?
To recap, we have learned several reasons why the Nest Thermostat may be changing the temperature and how you can make it so it will hold a given temperature for as long as you desire, rather be a schedule you choose or indefinitely until you change it.
Why Does Nest Thermostat Keep Changing Temp?
Nest Learning Thermostat is a learning thermostat that uses machine intelligence to create a schedule based on the temperatures you have previously set the thermostat to.


Early-On will change the temperature so that the house is at the temperature Nest thinks you desire when it thinks you will be ready for that temperature. For example, if you come from home from work at a certain time, Nest Thermostat can have the house ready when you get home.
Eco Temperatures is designed to reduce HVAC use when you are not home. It will lower the temperature threshold so that your air systems do not turn on as frequently.
Can You Lock the Temperature on the Nest?
This is one of the cool features I like about the Nest Thermostat, and it works well with the topic we just talked about, holding the temperature. If you set it to temperature and don’t want it changed. This is how to do it.
Can you lock the temperature on a Nest Thermostat?
Another thing is that the Nest Thermostat will still run according to schedule, even if it is locked. For me, this is nice for when my kid gets home from school and wants to excessively turn up the temperature. They can turn it up a little, but not a crazy amount when I have it locked. And they don’t have access to the settings without a PIN!
Here are the steps to lock your thermostat, either from the app or from the thermostat itself.
Lock your Nest Thermostat from Nest Thermostat:
- Click the Thermostat to bring up the main menu;
- Select Settings (There Gear looking icon with an exclamation point in the middle);
- Scroll to and Select Lock;
- Confirm you want to lock the thermostat;
- Enter the PIN;
- Enter the PIN again to confirm;
- Scroll to and Select which mode you want to lock (Heat, Cool, or Heat & Cool);
- Select the desired temperature range;
- Select Done.
Your Nest Thermostat is now locked. An icon that looks like a padlock will show up on the screen indicating that your Nest has successfully been locked.
Lock your Nest Thermostat from the Nest App:
- Select your Thermostat in the Nest app;
- Select Settings (There Gear looking icon in the top right corner);
- Scroll to and Select Lock;
- Confirm you want to lock the thermostat;
- Enter the PIN;
- Enter the PIN again to confirm;
- Scroll to and Select which mode you want to lock (Heat, Cool, or Heat & Cool);
- Select the desired temperature range;
- Select Lock.
If your Nest Thermostat isn’t nearby to confirm that it is locked, you can confirm in the app. Under the settings menu, the “Lock” option should now say “Unlock”.
Interesting video: “How to lock Nest thermostat temperature settings, Nest child lock feature”
If you want the thermostat to be unlocked, you can do so in the app or by entering the correct pin on the thermostat. Once the thermostat has been unlocked, you will have to repeat the locking steps again in order for it to be re-locked.
2 Ways Ending Nest Thermostats for Temperature Hold
If you want to change the ongoing hold on the thermostat, you will have to end the current hold. You can do it by either using the home app or thermostat. Let’s check out the both ways:
1. Using Thermostat
Listed below are the steps to end the current holding temperature:
- Proceed to the ‘menu view’;
- Tap on ‘stop’ to end the current hold.
2. Using App
To end the hold using the Home app, here’s what you need to do:
- Open the Home app;
- Hold after pressing your Nest thermostat’s tile;
- Now, tap on the ‘hold temperature’ button;
- In the last, you have to select the ‘End hold’ option.
The video will show you how to change the settings on your Nest thermostat to make it a manual thermostat and maintain the set temperature.
FAQs
Why is my Nest Thermostat not holding the temperature I set?
The Nest thermostats may not be holding the temperature because they could be dirty, have loose wiring, or require calibration.
How do I set my Nest thermostat to manual?
To set your Nest thermostat to the manual, you need to access the settings and then turn off the auto schedule from ‘Nest Sense’. Then proceed to eco temperatures and turn off the ‘heat to’ and ‘cool to’ options. Finally, reset your thermostat.
Conclusion
It may have seemed mysterious before, but now you should have the knowledge to hold the temperature on your Nest Thermostat and how to lock it if needed. The process is fairly straightforward and easy to remember after you’ve done it a time or two.
The Nest Thermostat is a great thermostat to have. It has great features, that overall have been well thought out and implemented. For most people, the Nest features will work out great after the Nest has learned your preferred temperature settings. However, that isn’t for everybody, and this article teaches you how to work around that one particular problem.
Recommended read:
How to Charge the Nest Thermostat? Some Effective Ways