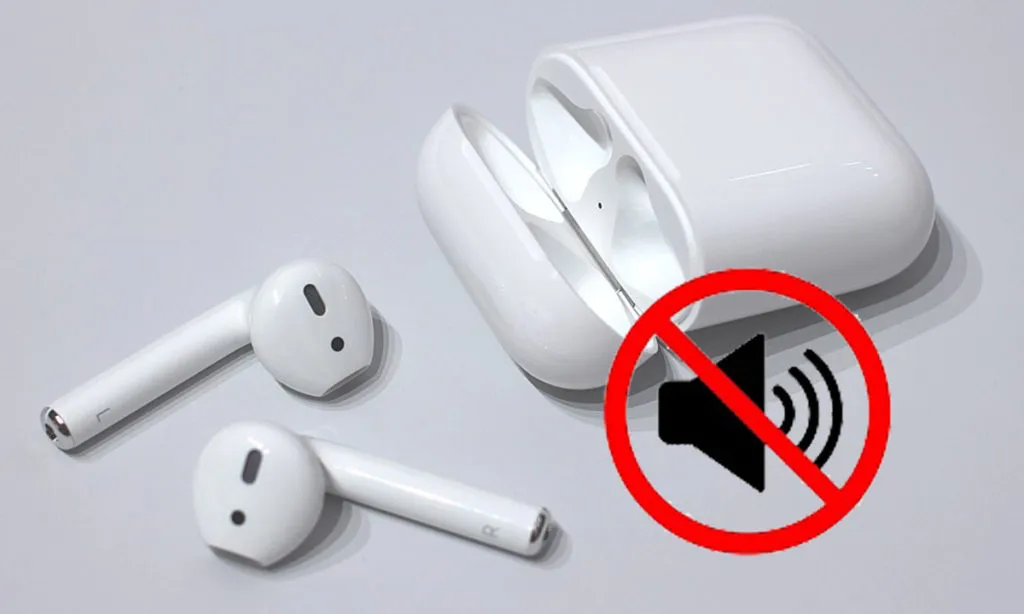
AirPods are a top-rated and successful Apple product. They’re simple to use and work amazingly! However, there are times they have issues that need to be fixed. One common problem is that AirPods seem to go quiet overtime or start having a low volume.
AirPods going quiet over time or only playing at a low volume is one of the most common problems people have. Keep reading to find out how to fix that problem.
You’ve probably set relatively high expectations for your Apple AirPods. Since they’re an Apple product and with how much a pair of Apple AirPods costs, most people expect high performance.
Then why are your AirPods so quiet?
Your AirPods may be quiet or have a low volume for one of the following reasons:
- Microphone and speaker mesh blocked by debris (Dust, Earwax, Sweat, etc.)
- Low Power Mode
- Volume Limit
- Balance Needs Adjusting
- Software Needs Updates
- Bluetooth synchronization issues
- Damaged AirPods
We’ll start by looking at the most common reason for a drop in AirPods volume and why they aren’t as loud as they used to be.
After that, we’ll look at six more potential problems that aren’t as common but maybe the reason for your AirPods’ lack of volume.

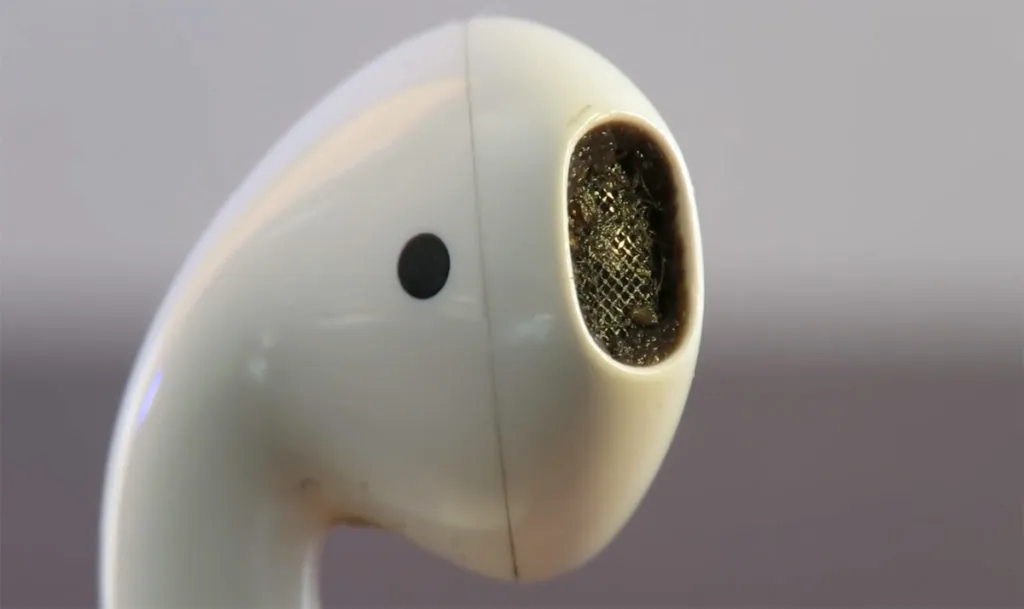
AirPods Microphone And Speaker Mesh Are Blocked By Debris (Dust, Earwax, Sweat, etc.)
Check the microphone and speaker mesh on each AirPod. The speaker mesh on your AirPods will get clogged in one way or another, whether it’s from your ears, dirty conditions, being dropped in food, or something else.
If the speaker in your AirPods is blocked, you’re not going to hear the entire volume.
The most common reason your AirPods aren’t delivering as much sound as they used to is that the speaker mesh is blocked by debris. The volume in your AirPods can drop considerably if earwax accumulates inside.
Even a minor accumulation of earwax in your AirPods can significantly reduce their sound quality.
Wearing your AirPods while you work out or using them in the rain can lead to moisture buildup. Once the sweat dries, the salt will remain and plug up the mesh, which in turn reduces sound quality.
AirPods also pick up dust. When AirPods are wet from rain or perspiration, dust will accumulate as they dry out.
The AirPods Pro’s silicone tips are particularly susceptible to dust, sweat, and earwax accumulation.
If the sound and volume on your AirPods Pro have suddenly deteriorated, check to see whether any gunk has accumulated in the tips. Take a good look, as at first glance it can be hard to notice that it’s caked on.

How To Clean Your Speaker On Your AirPods
Check and examine the speaker mesh on your AirPods and clean it as needed. For AirPods Pro, it’s a good idea to remove the rubber tips so you can clearly see the speakers and if they need to be cleaned.
Cleaning your AirPods is a pretty straightforward idea. However, since you’re working with somewhat delicate technology, you need to be sure that you’re not harming them and that you clean them properly.
Apple recommends that you “Clean the microphone and speaker meshes with a dry cotton swab.”
However, a cotton swab or Q-tip often isn’t enough to get the debris stuck in the mesh. As long as you are gentle enough, remove the remaining earwax and buildup from your AirPods using a clean, dry toothbrush.
Don’t use any soap or water! In fact, soap is on the list of things that Apple says may cause damage to your Airpods.
I’ve now referenced it a few times. Apple has a page that describes how they recommend cleaning your AirPods which can be found here.
Low Power Mode Limiting Audio Output
You may be thinking to yourself, “My AirPods were working perfectly fine, but did they just become quieter?”
Now would be a good time to check if your iPhone or iPad battery level is low. You can check this quickly by looking at the battery icon. Your Apple device is in “Low Power Mode” when the battery icon turns yellow.
“Low Power Mode” will activate to save battery power when your Apple device’s battery runs low. When your iPhone is charged to 80% or greater, Low Power Mode turns off automatically.
If the battery level is low, this could be what is causing your AirPods to become quieter.
While “Low Power Mode” is a great and practical feature, it can cause some functions on your phone to slow down or stop working.
According to Apple (Apple Article Here), Low Power Mode reduces or affects these features:
- Email fetch
- Background app refresh
- Automatic downloads
- Some visual effects
- Auto-Lock (defaults to 30 seconds)
- iCloud Photos (temporarily paused)
- 5G (except for video streaming)
While “Low Power Mode” doesn’t automatically lower your AirPods volume, it impacts 5G streaming. Apple says it doesn’t affect video streaming, but it may impact audio streaming.
Since “Low Power Mode” can fail to run 5G, you may notice changes in volume level and sound quality when streaming music over 5G.

How To Turn Off Low Power Mode
If you are in “Low Power Mode,” it can be turned off, and the volume on your AirPods should return to normal. While “Low Power Mode” will automatically turn off when the battery is charged to 80%, it can also be manually turned off.
You can use two methods to turn off “Low Power Mode.” One is through the settings app, and the other is by using voice commands with Siri.
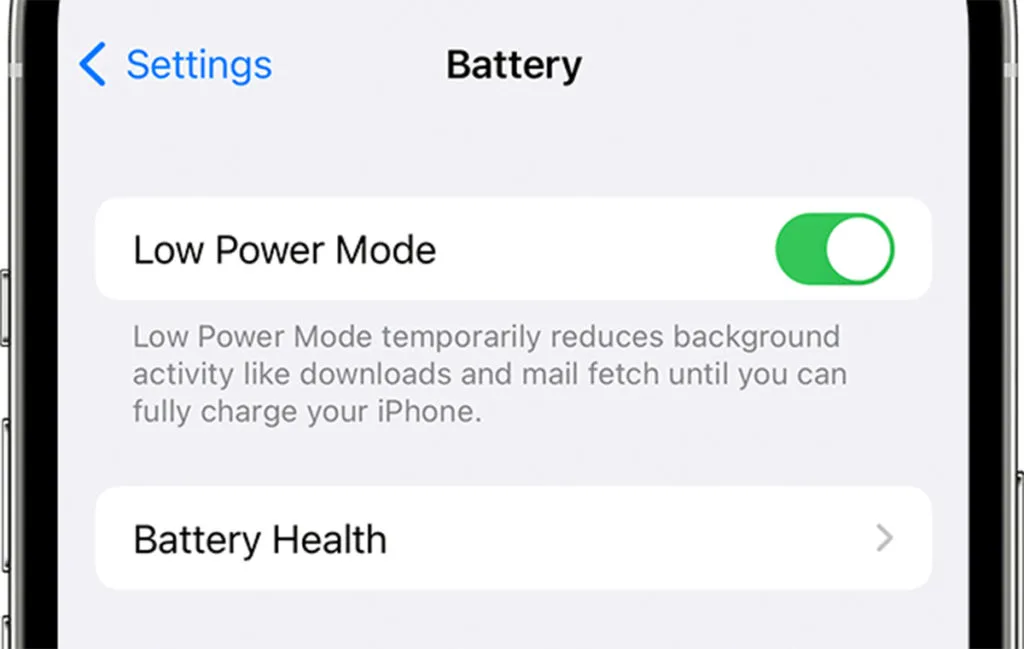
Here’s how to turn off “Low Power Mode” using the Settings app:
- Open your “Settings” app
- Select “Battery”
- Toggle “Low Power Mode” off. (Switch will be grey instead of green.)
Once this switch is toggled, your AirPods should return to their maximum volume level.
Here’s how to turn off “Low Power Mode” using Siri and Voice Commands:
- Say, “Hey Siri, turn off Low Power Mode”
To avoid further interruption, charge your iPhone or iPad for a while so it doesn’t enter “Low Power Mode” again, and the battery doesn’t die.
Volume Limit is Limiting AirPods
Most audio players have a feature that automatically prevents the volume from getting above a certain level. This feature is called a limiter and is a safety mechanism that keeps the volume from getting too loud and permanently damaging your ears.
Apple devices have an adjustable limiter under a feature named “Reduce Loud Sounds.”

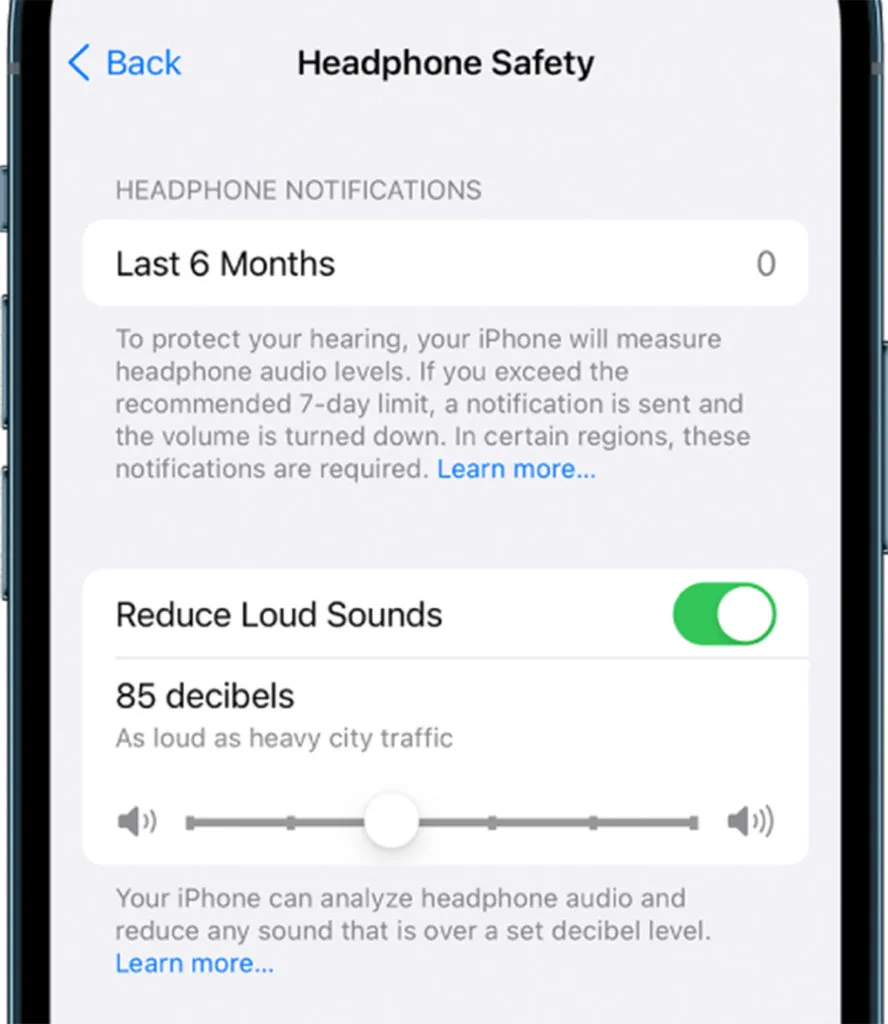
It works well for protecting your ears but is possibly too limiting for certain users.
The “Reduce Loud Sounds” feature measures your headphone volume level. It has a preset volume limit of 85 decibels (dB).
How To Adjust The Volume Limiter On Your iPhone or iPad
- Open your “Settings” app
- Select “Sound & Haptics” (iPhone 7 and later) or “Sounds” on earlier models
- Select “Headphone Safety”
- Toggle the “Reduce Loud Sounds” switch or adjust the volume limit
If you don’t want to turn it off completely, adjust the decibel slider to your desired level. Higher decibels mean the volume can get louder. However, I recommend you consider your hearing first.
Check out this chart for how long you can be exposed to a particular volume before permanent hearing damage occurs.

AirPods Balance Needs To Be Adjusted
Sometimes one AirPod will be quieter than the other earbud. If you have checked to make sure they are clean, this problem could be caused because they are not correctly balanced.
Balance is where you can set the volume level of one earbud higher or lower than the earbud.
This can make one of your AirPods appear quieter even when your volume is turned all the way up.
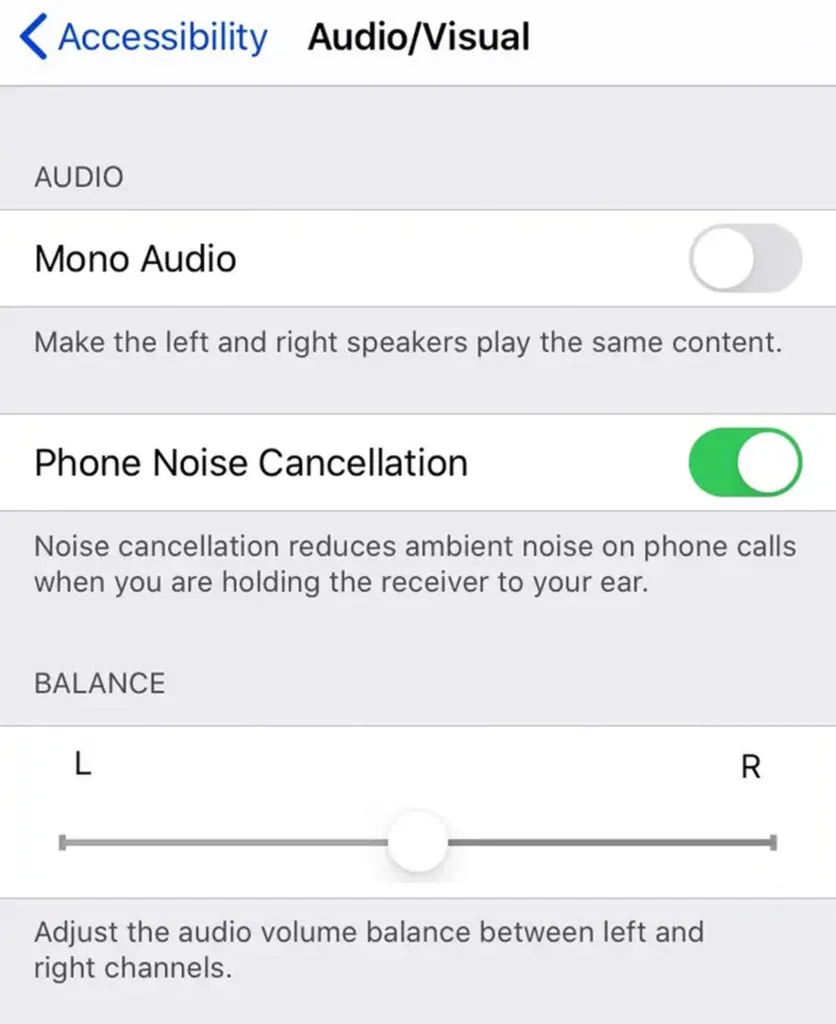
How To Adjust The Balance Of Your AirPods
- Open your “Settings” app
- Select “Accessibility”
- Select “Audio/Visual”
- Scroll down to “Balance”
- Make sure that the balance is set to the middle.

AirPods Firmware (Software) Needs To Be Updated
Firmware updates for the AirPods don’t come out very often, but Apple occasionally releases firmware updates. These updates may contain performance improvements, feature tweaks, or bug fixes.
If you’re having a particular issue with your AirPods, you can check which firmware version you have by following these steps.
How To Check AirPods Firmware Version
- Open your “Settings” app
- Select “General”
- Select “About”
- Select your AirPods name
- View “Firmware Version”
The trick is knowing if that version is the latest version or not. Apple doesn’t have a public page for viewing which firmware is the most current, nor do they have a firmware history.
To view the latest available firmware for your Airpods, I recommend going to the AirPods Wikipedia page, found here. The info panel on the right had a section labeled “Current Firmware,” which lists the version number and when it was released.
Now, what if you don’t have the latest firmware version? AirPods are designed to update automatically, as long as the device they’re paired with has an internet connection.
There is no way to force an update manually, but here are the steps you can take to ensure your AirPods get updated.
How To Update AirPods Firmware Version
- Make sure your AirPods are paired
- Place your AirPods in their case
- Place the AirPods on the charger
- Make sure the iOS device has an internet connection and is within range of the AirPods
Any available firmware updates should automatically be downloaded and installed shortly.
AirPod Bluetooth Connection Issues
There are situations where AirPods can become quieter due to a connection error, also known as Bluetooth synchronization errors.
One of the characteristics of this error is that the iPhone thinks your volume is at one level, and your AirPods think the volume is at a different level.
A Bluetooth synchronization error is different from Bluetooth interference.
Bluetooth interference can cause your AirPods to stutter, cut in and out, and even disconnect from your iPhone. This can be aggravating, especially if you just want to listen to music or watch a film.
Bluetooth connection errors or glitches often occur because one of the following reasons:
- Software bugs
- Out-of-range device
- Connection interference
How To Fix Bluetooth Synchronization Errors With Your AirPods
First, If you’re having trouble with Bluetooth on your AirPods, ensure the settings are all correct and that they were successfully paired.
If the settings all look correct, you can re-sync your AirPods by following this process:
- With both paired devices turned on and playing audio, turn the volume all the way down.
- Open your “Settings” app
- Select “Bluetooth”
- Select your AirPods
- Select “Disconnect”
- Keep playing audio from your iPhone with the volume at 0
- Reconnect your AirPods by selecting “Connect” from the same menu
If the problem was a Bluetooth sync issue, the volume issues on your AirPods should now be resolved.
The AirPods Are Damaged
This would be the worst-case scenario for why your volume is so low. Hopefully, your headphones are still under warranty, and you can have them replaced.
If your AirPods are suffering from water or heat damage, that means the electronics are damaged, and they are not going to be able to return to how they once worked.
You know how this feels if you’ve ever left your AirPods in your pocket while doing laundry.
This may be the worst part about buying such expensive earbuds.
The AirPods have been damaged and can no longer play music as they used to. If they’re broken, there’s simply no way to repair them.
Your solutions to this are:
- Buy a new pair of AirPods
- Replace them if under warranty
- Use them as-is at a lower volume
Summary
AirPods are an excellent purchase for those who love music, podcasts, or other audio. But the sound quality can be affected by environmental factors and damage to the device itself.
You aren’t alone if you’ve been wondering why y
our AirPods are so quiet—many people around the web report having the same problem.
The most common reason that the volume on your AirPods might not be as loud as they once were is because of the buildup of earwax, dust, sweat, and dirt that builds up in the speaker mesh.
There are other less common problems such as physical wear and tear, software bugs, or connection errors with Bluetooth.
If you think your AirPods are no longer working as they should, try some basic troubleshooting techniques like cleaning the mesh or updating the firmware. If this doesn’t work, you may need to replace your AirPods entirely.
Keep AirPods clean, and remember to check your phone’s settings before assuming your AirPods are broken and going out to buy another pair.